
Python
Python: Versatile, Readable, Powerful - Ideal for Web, AI.

HTML
HTML (HyperText Markup Language) is a coding language used to structure and create web content.

Tkinter
Tkinter: Python's GUI toolkit for creating user-friendly interfaces

Error Handling in Python
Python handles errors using try-except blocks for robustness.

Java Script
JavaScript is a versatile programming language primarily used for enhancing web pages by making them interactive and dynamic

Database for Python
Python uses libraries like SQLAlchemy for SQL database interaction.

PHP
PHP (Hypertext Preprocessor) is a server-side scripting language designed for web development to create dynamic web pages and applications
- දැනට Python විතරයි තියෙන්නේ. ඉතිරි Languages ඉක්මනට සම්පූර්ණ වේවි. 😊
- Latest updates සහ news සඳහා Notes වෙත පිවිසෙන්න.
Fundamentals of Programming
Created at : 2024-02-01
What is a Computer Program?
Computer Program එකක් කියන්නෙ Computer එකට කළ යුතු දේ පවසන උපදෙස් මාලාවක්.
මොනවද මේ උපදෙස් කියන්නෙ?
අපි බලමු තේ එකක් හදනවා වගේ උදාහරණයක්.
- මුලින්ම වතුර කේතලයට දාගන්න.
- වතුර රත් කරන්න.
- කැමති වර්ගයක තේ බෑග් එකක් කෝපයට දාන්න.
- දැන් රත් වුනු වතුර ටික කෝප්පයට දාන්න.
- තේ හොඳින් කලවම් කරගත්තට පස්සෙ තේ බෑග් එක අයින් කරන්න.
- දැන් අවශ්ය ප්රමාණයට සීනි, අවශ්යනම් කිරි එකතු කරගන්න.
- දැන් හොඳින් කලවම් කරගන්න.
අන්න ඒ වගේ දේකට තමයි උපදෙස් මාලාවක් කියන්නෙ.
ඒ විදියට computer එකට ලබාදෙන උපදෙස් මාලවකට computer program එකක් කියනවා.
Created at : 2024-02-01
Programming Languages
- Programs ගොඩක් language භාවිතා කරල නිර්මාණය කරනවා.
- Website නිර්මාණය කරද්දි Javascript,PHP සහ Games නිර්මාණය කරන්න C++ උදාහරණ විදියට කියන්න පුළුවන්.
Programming Languages සංසන්දනය සහ විශ්ලේෂණය කරන්න මූලිකව අංශ 3ක් ඔස්සේ කතා කරනවා.
- Data
- Syntax
- Sementic
Data කියන්නෙ Variables, Constants, Data types වගේ දේවල්. මෙතන යටින් තියන example එක බැලුවාම එතන Data වලට උදාහරණයක් විදියට program එකට ඇතුලත් කරන x = 10 කියන්නෙ Data එකක්. syntax කියන්නෙ මේ code එකේ තියන grammer ටික. ඒ කියන්නෙ if කියල පටන් ගත්තම අවසාන වෙන්න ඔනෙ : එකකින්. අන්න ඒ වගේ දේවල්. sementic කියන්නේ code එකේ තේරුම. x 5ට වඩා විශාලනම් "x is greater than 5" කියන එක print කරන්න කියල සහ එහෙම නැත්තම් "x is not greater than 5" print කරන්න කියන එක තමයි මේකෙ තේරුම.
x=10

if x > 5:
    print("x is greater than 5")
else:
    print("x is not greater than 5")
Example for Programming languages
| Language | mostly Use for |
|---|---|
| Python | web development, data science, artificial intelligence (කෘතීම බුද්දිය), machine learning, scientific computing, automation |
| JavaScript | මූලිකවම front-end web development සඳහා |
| C# (C-Sharp) | Windows applications, web applications (using ASP.NET), Unity හරහා game development කිරීමට. |
| C++ | mobile app development (Android), web development (backend) |
| PHP | මූලිකව server-side web development කිරීමට සහ dynamic web pages and applications සෑදීමට. |
Created at : 2024-02-01
Levels of Programming Languages
Programming languages වල මට්ටම් කිහිපයක් තියනවා.
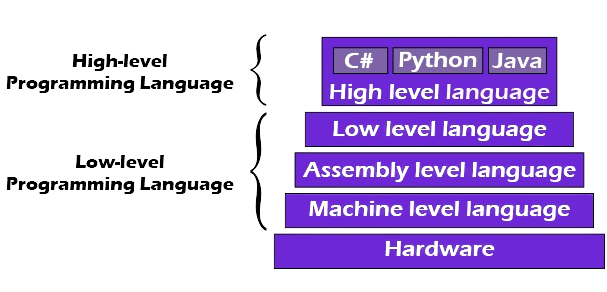
Programming Languages මූලිකව කොටස් 2කට වෙන් කරන්න පුලුවන්.
- Low-level language
- High-level language
Low-level language
Low-level language යටතේ තියන භාෂා වලට Machine language සහ assembly language අයත් වෙනවා. මේවා කියවලා තේරුම් ගන්න ටිකක් අපහසුයි.
Machine language
Machine language කියන්නේ 0 සහ 1 වලින් සමන්විත භාෂාවක්. ඒ වගේම computer එකට තේරුම් ගන්න පුලුවන් ද්වීමය ඉලක්කම් වලින් නිසා ඒ ආකරයට තමයි computer එකට උපදෙස් දෙන්න වෙන්නෙත්. තේරුම් ගැනීමේ අපාසුතාවයත්, එක් computer එකක ලියා ඇති program එකක් වෙනත් computer එකකට වලංගු නොවීම වැනි දේවල් නිසා Program එකක් ලිවීම සඳහා machine language භාවිතා කිරීම එතරම් සුදුසු දෙයක් නෙවෙයි.
Assembly language
Assembly language හි mov, add, sub වගේ අපිට කියවන්න පුලුවන් විධාන කිහිපයක් අඩංගු වෙනවා. ඒ නිසා machine language වලට වඩා assembly language එකක අඩංගු දේ තේරුම් ගැනීම පහසුයි.
නමුත් computer හඳුනන්නේ machine language පමණයි. ඒ නිසා මේ assembly language එක machine language එකක් බවට පරිවර්තනය කරන්න පරිවර්තකයක් අවශ්ය වෙනවා. අපි ඒ පරිවර්තකය assembler කියලා හඳුන්වනවා.
High-level language
Low-level language අපට තේරුම් ගැනීමට අපහසු උනත් high-level languages අපිට තේරුම් ගැනීමට පහසුයි. ඒවා සාමන්යා ඉංග්රීසි භාෂාවට සමීපව නිර්මාණය කරලා තියනවා. High-level language එකක් low-level language එකකට පරිවර්තනය කරන්නේ compiler එක මගින්.
Created at : 2024-02-01
Compiling And Interpreting
Fev Defenetions (අර්ථ දැක්වීම් කිහිපයක්)
Source Code - Programmer කෙනෙක් විසින් නිර්මාණය කරපු Code එක.
Machine Code - Machine එකට කියවන්න පුළුවන් Code එක.
Programming Languages ඒවා execute කරන විදිය අනුව ක්රම දෙකකට බෙදෙනවා. ඒවා compiling වලින් සහ Interpreting වලින් කියල වෙන් කරන්න පුළුවන්.
Compiling
සම්පූර්ණ Source Code එක Machine Code එකක් බවට පරිවර්තනය කරලා ඊට පස්සෙ Execute කරන එකට තමයි Compile කරනවා කියන්නෙ.
Interpreting
Source Code එක තීරුවෙන් තීරුව Execute කරන එක තමයි Interpreting වලින් වෙන්නෙ.
යටින් තියන උදාහරණයෙන් ඒක තේරුම් ගන්න පහසුයි.
Created at : 2024-02-01
Python
- Python කියන්නෙ High Level Programming Language එකක්.
- Python Translate සහ Run කරන engine එකට අපි කියනව Python Interpreter කියලා.
- අපිට ඒක use කරන්න විදි දෙකක් තියනව. Interactive mode(Immediate mode) සහ Script mode කියලා.
- Interactive mode එකේදි අපි Command එකක් දීල Enter කරාට පස්සෙ ඊලඟ Step එකේදි Output එක ලැබෙනවා.
- Script mode එකේදි කරන්නෙ අපි අපේ Python programm එක file එකක ලියල ඒක save කරලා ඊට පස්සෙ execute කරන එක. අපිට මේක Save කරාට පස්සෙ ඕන වෙලාවක ආයෙ මේ file එක edit කරන්න run කරන්න පුළුවන්.
- Python run කරන්න interpreter එකක් ඕනේ. ඒකෙන් තමයි python program එක කියවලා execute කරන්නෙ.
Start Learn Python
Created at : 2024-02-01
Settings Up the Development Environment
Download Python Installer
Install steps
Python installer එක download කරගන්න.

Download කරපු installer එක open කරලා. පහත පියවර අනුගමනය කරන්න.

Add python.exe to PATH තෝරන්න. පසුව Customize installation Click කරන්න.

ඉහත ආකාරය තහවුරු කරගෙන Next click කරන්න.
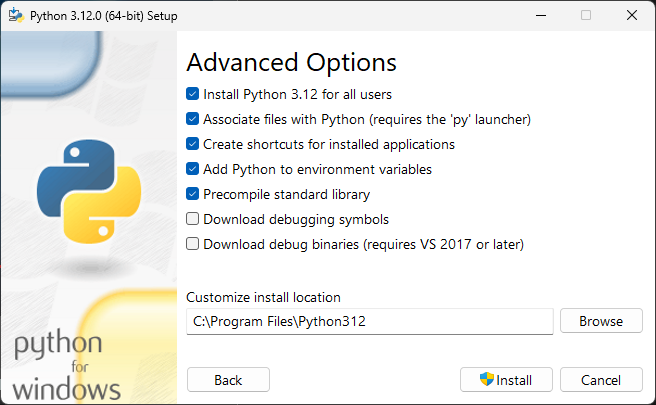
Install Python for all users Select කර Install Click කරන්න.
Python IDLE
Created at : 2024-02-01
Python Print Statements
python code කරන නිවැරදි විදි ගැන බලමු.
Fev Defenetions (අර්ථ දැක්වීම් කිහිපයක්)
Function - Function එකක් කියන්නෙ නිශ්චිත කාර්යයක් හෝ කාර්යයන් සමූහයක් සිදු කරන නැවත භාවිත කළ හැකි code කොටසක්.
Variable - Variable එකක් කියන්නෙ Data store කරල තියන දේකට.
Comments - # වලින් පටන් ගන්න code line එකක් comment එකක් වෙනවා. ඒක execute වෙන්නේ නැහැ. අපිට දෙයක් මතක තියාගන්න ඕනනම් සහ අදහසක් ලියල තියන්න comments භාවිතා කරන්න පුළුවන්.
Strings - String එකක් උඩු කොමා ('' හෝ "") ඇතුලෙ ලියන්නෙ. ඉස්සරහට ඒව ගැන අපි කතා කරනවා.
Basic print statements
Try itprint("Hello, World!") #Output: Hello, World!print() කියන function එක අපි භාවිතා කරන්නෙ text එකක් හෝ වෙනත් values මොනවාහරි display කරන්න.. ඒ කියන්නෙ කලින් උදාහරණය ගත්තම Hello, World! කියන එක තමයි output එක විදියට අපිට පෙන්නන්නෙ.
Print variables
Try itname = "John" age = 25 print("Name:", name, "Age:", age) #Output: Name: John Age: 25මේ උදාහරණෙදි output එක විදියට එන්නෙ
Name: John Age: 25කියන එක. name, age කියන්නෙ Variables.F-strings (formatted string literals)
Try itname = "Charlie" age = 35 print(f"Name: {name}, Age: {age}") #code line 3මේ උදාහරණෙදි output එක විදියට එන්නෙ
Name: Charlie, Age: 35කියන එක.
"#code line 3" එකෙන් print වෙන දේ ගැන හිතල බලමු. මෙතනfකියන අකුර String එකට කලින් ඇතුලත් කරන්න ඕන. ඊට පස්සෙ අපිට පුළුවන් වෙනව string එක ඇතුලට variable ඇතුලත් කරල ඒ string එක print කරන්න. {} වරහන් ඇතුලෙ තියන Variable අපිට print කරන්න පුළුවන් වෙනවා ඒ නිසා.
Try itprice = 24.99 quantity = 3 total = price * quantity print(f"Total cost: ${total:.2f}") #code line 4මේ උදාහරණෙදි output එක විදියට එන්නෙ
Total cost: $74.97කියන එක. මෙතන total එක වෙන්නෙ, price කියන variable එකේ අගය ගුන කිරීම quantity කියන variable එකේ අගය. ඊට පස්සෙ අපි ඒක print කරනවා "code line 4" දී.
"Total cost: $"කියන string එකට total එන අගය දශමස්තාන දෙකක් එන විදියට එකතු වෙනවා. ඒක තමයි{total:.2f}කියන එකෙන් වෙන්නෙ. code එක copy කරගෙන .3f , .4f විදියට try කරලා බලන්න.-
Concatenation
Try itgreeting = "Hello" subject = "Python" print(greeting + ", " + subject + "!") #code line 3මේ උදාහරණෙදි output එක විදියට එන්නෙ
Hello, Python!කියන එක.
මෙතනදි වෙන්නෙ greeting කියන variable එකට ", " string එක එකතු වෙලා ආයෙත් subject කියන variable එක එකතු වෙලා අවසානෙට "!" string එක එකතු වෙන එක. ඒකට අපි + ලකුණ පාවිච්චි කරනවා. -
Escape Characters
Try itprint("This is a line\nThis is a new line\tThis is a tab")මේ උදාහරණෙදි output එක විදියට This is a line කියන එක ඇවිත් ඊලඟ පේලියේ This is a new line කියන එක ඇවිත් tab space එකකට පස්සෙ This is a tab කියන එක print වෙනවා.
මෙතනදි වෙන්නෙ \n කියන එකෙන් පස්සෙ තියන කොටස අලුත් line එකකින් පටන් ගන්න එක සහ \t කියන එකෙන් tab space එකක් ලැබෙන එක. code කරනකොට tab spaces සහ අලුත් line එකකින් ඊලඟ කොටස ලබාගන්න අපිට Tab සහ Enter Button භාවිතා කරන්න බැහැ.
Created at : 2024-02-01
Python comments
Comments අපේ programme එකේදි execute වෙන්නේ නැහැ. ඒ කියන්නෙ ඒක output එකක් විදියට ලැබෙන්නෙ නැහැ. අපි comments භාවිතා කරන්නෙ code කොටසකින් වෙන දෙයක් හෝ අදහසක් වැනි දෙයක් code එක ඇතුලේ පෙන්වන්න. ඒක programmer ගෙ පහසුවට ලේසියට තමයි අපි භාවිතා කරන්නේ.
-
Single-line Comments
Try it# This is a single-line commentතනි line එකක් comment කරන්න # ලකුණ මුලින් භාවිතා කරනවා.
-
Multi-line Comments
Try it""" This is a multi-line comment. It can span several lines and is enclosed by triple-quotes. """line සමූහයක් comment කරන්න """ ලකුණු තුනක් මුලින් සහ අගින් භාවිතා කරනවා.. (''' හෝ """) භාවිතා කල හැකී.
Created at : 2024-02-01
Indentation
Fev Defenetions (අර්ථ දැක්වීම් කිහිපයක්)
- Block of Code - Statement එකක හෝ සමූහයක එකතුවක්. ඒවා execute වෙන්නෙ තනි එක්කයක් විදියට.
- Indentation - Indentation කියන්නෙ code line එකක් ආරම්භයේ ඇති හිස් ඉඩ ප්රමාණයන් ය.
Note
ගොඩක් programming Language වලදී if statement එකකට අයත් වෙන code block එක අපි {} දෙකක් අතුලෙ තමයි ලියන්නේ. ඒත් Python වල භාවිතා කරන්නෙ : (colan).
x=5

if x > 0:
    print("x is greater than 0")
else:
    print("x is not greater than 0")
if සහ else තුල ඇති code block අනෙක් ඒවාට වඩා ටිකක් ඉදිරියෙන් තියෙන්නේ.ඒ වගේ හිස් ඉඩ ප්රමාණ ගැන තමා මෙතනදි කතා කරන්නේ. එහෙම ඉඩක් නැති වුනොත් code එක හරියට වැඩ කරනන්නේ නැහැ.
මෙතනදි x = 5 ක් වෙනවා. x, 0 ට වඩා විශාල වෙනවන්ම් (x > 0) එතනින් යට තියන x is greater than 0 කියන එක print වෙනවා. එහෙම නැතිනම් x is not greater than 0 කියල print වෙනවා.
Created at : 2024-02-01
Operations
Operations වර්ග කිහිපයක් තියනව. කිහිපයක් මෙතනදි බලමු.
x = 10
y = 7
a = x + y #Addition
b = x - y #Subtraction
c = x * y #Multiplication
print(a)
print(b)
print(c)
Code එකේ ඉස්සරහින් comment කරල තියෙන්නෙ ඒකට අදාල operation එක.
Created at : 2024-02-01
Python Variables
Variables
- Variables භාවිතා කරන්නෙ data store කරන්න.
- Variable එකක් ප්රකාශ කරන්න Python විශේෂ ක්රමයක් නැහැ.
- Variable එකක් හැදෙන්නෙ ඒකට value එකක් assign වෙන වෙලාවෙදිමයි.
- Variable එකට assign වෙලා තියන values වල data types ප්රකශ කරන්න අවශ්ය නැහැ. නමුත් අවශ්යනම් සඳහන් කරන්න පුළුවන්. code line 4 බලන්න.
- Variable එකට assign වෙලා තියන values වල data types ලබාගන්න ඕනෙ නම් type() යන function එක භාවිතා කරන්න පුළුවන්.code line 7 බලන්න.
name = "John"

age = 25
age = int(3) # code line 4

pi_value = 3.14
print(type(pi_value)) # code line 7
Variable Names
Fev Defenetions (අර්ථ දැක්වීම් කිහිපයක්)
Keywords - Python වල තියන function, method වගේ දෙවල් වල නම්. උදා-: print, if, else .
Variable Names නිර්මණය කරන්න කොන්දේසි කිහිපයක් තියනවා.
- Variable name එකක් අකුරකින් හෝ _ (underscore) එකකින් ආරම්භ විය යුතුයි.
- Variable name එකක් ඉලක්කමකින් ආරම්භ නොවිය යුතුයි.
- Variable name එකක් (A-z, 0-9, සහ _ ) යන ඒවායින් පමණක් සමන්විත විය යුතුයි.
- Variable names case-sensitive වේ. ඒ කියන්නෙ NAME, name, NaMe, කියන වචන තුන තුනක්. Capital සහ simple අකුරු වලින් නම් වෙනස් වෙනවා.
- Variable names Python Keywords වල නම් වලින් නොතිබිය යුතුය. උදා -: and, if, elif, true, ...
Assign Values to Variables
Assign කරනවා කියන්නේ අගයක් ලබා දෙන එකට.
Many Values to Multiple Variables
Try ita, b, c = 1, 2, 3 print(a) print(b) print(c)මෙතනදි a ට 1ත් b ට 2ත් යන විදියට values 3ම assign වෙනවා. (එක් වරකට variable කිහිපයකට අගයන් කිහිපයක් ලබාදෙන ආකාරයක්)
One Value to Multiple Variables
Try ita = b = c = 1මෙතනදි a, b, c කියන variable 3ටම 1 කියන value එක assign වෙනවා.(එක් වරකට variable කිහිපයකට තනි අගයක් ලබාදෙන ආකාරයක්)
Unpack a Collection
Try itnumbers = [1, 2, 3] a, b, c = numbers print(a,b,c)මෙතනදි a, b, c කියන variable 3ට numbers කියන list එකේ තියන values assign වෙනවා.
Get Outputs
මෙතනදි Variables print කරන විදි කීපයක් තියනවා. , සහ + වලින් variable දෙකක් එක විට print කරන්න පුළුවන්. නමුත් , භාවිතා කරන විට වචන වෙන් වන අතර + ලකුණ භාවිතා කරන විට වචන වෙන් නොවේ. සංඛ්යාත්මක අගයන්ට භාවිතා කරන විට + ලකුණ යෙදීමෙන් එම සංඛ්යා 2හි එකතුව print වේ.
name = 'nimantha'
age = 23
university = 'UOC'
degree_period = 3

print(name, university) #nimantha UOC
print(name + university) #nimanthaUOC
print(age, degree_period) #23 3
print(age + degree_period) #26
Global Variables
Variable එකක් function එකකට පිටතින් හැදුවාම ඒක globle variable එකක් වෙනවා. ඒක function එකක් අතුලේ සහ පිටත ඕනෑම තැනක භාවිතා කරන්න පුළුවන්. function එකක් ඇතුලෙ තියන variable එකක් ඊට පිටතින් භාවිතා කරන්න ඕන නම් global කියන keyword එක භාවිතා කරන්න ඕන. code line 4 බලන්න.
university = 'university of colombo'

def func():
  global university2 #code line 4
  university2 = 'university of kelaniya'
  print("my university is " + university)

func() #my university is university of colombo
print("my university is " + university) #my university is university of colombo
print("my university is " + university2) #my university is university of kelaniya
Created at : 2024-02-01
Python Data Types
| Data Type | Description | Example |
|---|---|---|
| int | Integer (නිඛිල සංඛ්යා) | |
| float | Floating-point number (දශම සංඛ්යා) | |
| complex | Complex number (සංකීර්ණ සංඛ්යා) | |
| str | String (වචන වැනි දෑ. ඉලක්කම් වුවද ඇතුලත් කළ හැකිය.) | |
| bool | Boolean | |
| list | List | |
| tuple | Tuple | |
| set | Set | |
| dict | Dictionary | |
| frozenset | Immutable set | |
| bytes | Bytes | |
| bytearray | Mutable sequence of bytes | |
| memoryview | Memory view object | |
| range | Immutable sequence of numbers | |
| NoneType | None | |
Created at : 2024-02-01
Python Numbers
Type Converting
Numbers වල data type එක වෙනස් කරන්න පුළුවන්. උදාහරණයකට 5 කියන්නෙ int එකක්. ඒක float එකක් විදියට පරිවර්තනය කරන්න පුළුවන්.
x = 5    #int

a = float(x) #float

print(type(x))
print(type(a))
Created at : 2024-02-01
Python Strings
Fev Defenetions (අර්ථ දැක්වීම් කිහිපයක්)
index - Array වැනි දේවල් වල තියන characters හඳුනාගන්න ඒවාට 0 න් පටන් ගන්න විදියට ලබා දෙන අංක.
Loop - loop එකක් කියන්නෙ code block එකක් නැවත නැවතත් ක්රියාත්මක කිරීමට ඉඩ සලසන පාලන ව්යුහයක්.
- Python String එකක්
""ඇතුලත හෝ' 'ඇතුලත තමයි ලියන්නෙ. code line 1, 2 - String Value එකක් variable එකකට assign කරන විදිය code line 4 න් බලාගන්න පුළුවන්.
- line කිහිපයක string එකක් නිර්මාණය කරන විට
"""හෝ'''ක් භාවිතා කරනවා (code line 8). මෙතනදි මේ string එක comment එකක් නොවෙන්නේ මේක variable එකකට assign වෙලා තියන නිසා. - String එකක් array එකක් විදියට භාවිතා කරන්නත් පුළුවන්. Array ගැන ඉස්සරහට කතා කරමු.
print(c[1]), මෙතනදි e අකුර print වෙනවා මොකද Array එකක පලවෙනි කෙනාගෙ index එක වෙන්නෙ 0 නිසා (H = 0 , e = 1 , l = 2 , l = 3 , o = 4 , ......) - string එකක තියන characters loop එකක් භාවිතා කරල ලබාගන්නත් පුළුවන් (code line 15).
- String එකක දිග ගන්නෙ
len()කියන function එකෙන්. (code line 17) - කුමක් හෝ string කොටසක් string එක ඇතුලෙ තියනවද කියල check කරගන්න අපිට
inkeyword එක භාවිතා කරන්න පුළුවන් (code line 19). මෙතනදි එන්නෙ true/ false කියන boolean values දෙක. ඒ වගේම නැතිද කියන එක check කරන්නnot inkeyword භාවිතා කරන්න පුළුවන්.
print('python') #code line 1
print("python") #code line 2

a = 'hello'  #code line 4
print(a)

b = '''hello
python'''   #code line 8
print(b)

c = "Hello, python!"
print(c[1]) #code line 12

for x in c:
  print(x)  #code line 15

print(len(a)) #code line 17

print("python" in c) #code line 19
- Python Strings කොටස් විදියට වෙන් කරගන්න පුළුවන්.
print(c[1:5]), මේ code එකේ [] ඇතුලෙ තියන index ගැන බලමු. ඉස්සරලම තියෙන්නෙ [1:5] කියලා. 1 කියන index එකට අදාල character එකෙන් පටන්ගෙ index එක 5 ට තියන character එක ලඟට එනකම් මෙතනදි වෙන් වෙනවා. නමුත් index එක 5 වෙන character එක ලබගන්නෙ නැහැ. - දෙවනුවට තියන එකේදි වෙන්නෙ මුල සිට index එක 5 වෙනකම් ලබාගන්න එක.
- තුන්වෙනි එකෙත් index එක 7 සිට අවසානය දක්වා ලබාගන්නවා.
- හතරවෙනි එක ටිකක් විශේෂයි. string එකක පලවෙනි index එක වෙන්නෙ 0. තව එකකින් index එක අඩු වුනොත් string එකේ අවසානෙට තියන chracter එක තමයි හඳුනාගන්නෙ. ඒ විදියට දකුනේ ඉඳන් වමට එනකම් index එක අඩු වීගෙන යනවා. (-7 < -1)
c = "Hello, python!"

print(c[1:5]) #ello
print(c[:5])  #Hello
print(c[7:])  #python!
print(c[-7:-1]) #python
Fev Defenetions (අර්ථ දැක්වීම් කිහිපයක්)
Method - method එකක් කියන්නෙ function එකක්. නමුත් කිසියම් කොටසකට මේ function එක ක්රියා කරන නිසා මේකට method එකක් කියනවා. object.method()
- String එකක් uppercase කරන්න සහ lowercase කරන්න පුළුවන්
.upper()සහ.lower()methods වලින්. - string එකේ මුලින් සහ අගින් තියන හිස්තැන් ඉවත් කරන්න
.strip()method එක භාවිතා කරනවා. - string එකක් string කොටස් වලට වෙන් කරන්න
.split()භාවිතා කරනවා. - string එකක කොටසක් වෙනත් කොටසකින් ප්රතිස්තාපනය කරන්න
.replace('old text', 'new-text')භාවිතා කරනවා.
c = "  Hello, python!  "

print(c.upper()) #  HELLO, PYTHON!
print(c.lower())  #  hello, python!
print(c.strip())  #Hello, python!
print(c.split()) #['Hello,', 'python!']
print(c.replace('python', 'world')) #  Hello, world!
- මුලින්ම තියෙන්නෙ
.join()method එක භාවිතා කරලා string දෙකක් එකතු කරන විදිය. - දෙවෙනියට තියෙන්නෙ සාමන්ය විදියට string දෙකක් එකතුකරන විදිය සහ තුන් වෙනියට තියෙන්නේ operators භාවිතා කරලා string දෙකක් එකතු කරන විදිය.
- අන්තිමට තියෙන්නේ
.format()method එක භාවිතා කරලා. මෙතනදි {} ඇතුලට.format()method එකෙන් ලබාදෙන values assign වෙනවා. {} තියන පිලිවෙලට තමයි මේ values assign වෙන්නෙ. පිලිවෙල වෙනස් කරන්න ඕනනම් index number එක {} ඇතුලෙ සඳහන් කරන්න පුළුවන්. ඒ වගේම අන්තිමට තියන ක්රම තුනටම භාවිතා කරන්න පුළුවන්.
words = ["Hello,", "python!"]
result = " ".join(words)
print(result) #Hello, python!

print("Hello," + " " + "python!") #Hello, python!

str1 = "Hello,"
str1 += " " + "python!"
print(str1) #Hello, python!

str3 = "Hello,"
str4 = "python!"
result = "{} {}".format(str3, str4)
print(result) #Hello, python!

result = "{} {}"
print(result.format(str3, str4)) #Hello, python!

result = "{1} {0}"
print(result.format(str3, str4)) #python! Hello,
Escape Characters in Strings
Escape Characters කියන්නේ සාමන්යයෙන් අපිට Python වලදී ඇතුලත් කරන්න බැරි දේවල් ටිකක්. උදාහරණයකට අපිට He says that 'i am fine' කියන දේ print කරන්න ඕනේනම් print('He says that 'i am fine'') කියන විදියට අපිට ඒක print කරන්න බැහැ.පිටින් තියන '' භාවිතා කරල තියෙන්නේ string එකට සහ ඇතුලෙන් තියන '' භාවිතා කරලා තියෙන්නේ 'i am fine' මේ වචනය print කරන්නයි. අන්න ඒ වගේ අවස්තාවකදී sytax error එකක් එනවා. ඒක මගහරින්නනම් ' වෙනුවට \' භාවිතා කරන්න වෙනවා. string එක print('He says that \'I am fine\'') විදියට වෙනස් කලයුතුයි.
| Escape Sequence | Meaning | Example |
|---|---|---|
\' |
Single Quote | print('This is a single quote: \' ') |
\\ |
Backslash | print('This is a backslash: \\ ') |
\n |
New Line | print('This is a new line.\nSecond line.') |
\r |
Carriage Return | print('This is a carriage return.\rOverwritten text.') |
\t |
Tab | print('This is a tab.\tIndented text.') |
\b |
Backspace | print('This is a backspace.\bBackspaced text.') |
\f |
Form Feed | print('This is a form feed.\fNew page.') |
\ooo |
Octal Value | print('Octal value: \110\145\154\154\157') |
\xhh |
Hex Value | print('Hex value: \x48\x65\x6c\x6c\x6f') |
Another Methods
s = "Hello, Python!"
| String Method | ||
|---|---|---|
| capitalize() | ||
| Description | Returns a copy of the string with its first character capitalized. String එකේ මුල් අකුර Capital කිරීමට. |
|
| Example | s.capitalize()Try it |
|
| Result | Hello, python! |
|
| casefold() | ||
| Description | Returns a casefolded version of the string, suitable for case-insensitive comparisons. String එකේ අකුරු සියල්ලම simple කරයි. නමුත් මේය භාවිතා කරන්නේ capital සහ simple අකුරු නිසා string එක වෙනස් වීම වැලැක්වීමටයි. උදා -: COMPUTER = Computer = CoMputer |
|
| Example | s.casefold()Try it |
|
| Result | hello, python! |
|
| center(width, fillchar) | ||
| Description | Returns a centered string of a specified width, padded with a specified character (default is space). String එක දෙපසට හිස් ඉඩක් හෝ අවශ්යනම් වෙනත් යමක් හෝ ඇතුලත් කර string එක මැදට කිරීමට. |
|
| Example | s.center(20, '*')Try it |
|
| Result | ***Hello, Python!*** |
|
| count(substring, start, end) | ||
| Description | Returns the number of occurrences of a substring in the given range. දී ඇති පරාසයක් තුල යම් string කොටසක් තිබෙන වාර ගණන ලබාගැනීමට. |
|
| Example | s.count("o", 0, 6)Try it |
|
| Result | 1 |
|
| endswith(suffix, start, end) | ||
| Description | Returns True if the string ends with a specified suffix; otherwise, returns False.String එකේ අවසානම character එක පරීක්ශා කිරීමට. |
|
| Example | s.endswith("Python!")Try it |
|
| Result | True |
|
| find(substring, start, end) | ||
| Description | Returns the lowest index of the substring in the given range. Returns -1 if the substring is not found. String කොටසක් පවතින අඩුම index එක ලබාගැනීමට. හමු නොවුනොත් -1 ලැබේ. |
|
| Example | s.find("lo")Try it |
|
| Result | 3 |
|
| index(substring, start, end) | ||
| Description | Similar to find(), but raises an exception if the substring is not found. |
|
| Example | s.index("lo")Try it |
|
| Result | 3 |
|
| isalnum() | ||
| Description | Returns True if all characters in the string are alphanumeric; otherwise, returns False. |
|
| Example | s.isalnum()Try it |
|
| Result | False |
|
| isalpha() | ||
| Description | Returns True if all characters in the string are alphabetic; otherwise, returns False. |
|
| Example | s.isalpha()Try it |
|
| Result | False |
|
| isdigit() | ||
| Description | Returns True if all characters in the string are digits; otherwise, returns False. |
|
| Example | s.isdigit()Try it |
|
| Result | False |
|
| join(iterable) | ||
| Description | Joins the elements of an iterable (e.g., a list) with the string as a separator. | |
| Example | " ".join(["Hello,", "Python!"])Try it |
|
| Result | Hello, Python! |
|
| lower() | ||
| Description | Returns a copy of the string with all uppercase letters converted to lowercase. | |
| Example | s.lower()Try it |
|
| Result | hello, python! |
|
Created at : 2024-02-01
Python Booleans
- Boolean Values දෙකක් තියනවා.
TrueසහFalseකියන්නෙ ඒ values දෙක. - Python වල කිසියම් ප්රකාශයක් හරිද වැරදිද කියලා මේ boolean value දෙකෙන් අපිට දැනගන්න පුළුවන්.
bool()function එක භාවිතා කරන විට integer එකක් 0 වෙනවනම් සහ lists, strings හිස් වෙනවානම්FalseOutput කරනවා. එහෙම නැතිනම්Trueoutput කරනවා. ##.. comment එකෙන් පසු code එක බලන්න.
print(1 == 2) #False
print(1 > 2) #False
print('a' == 'b') #False

print(1 == 1) #True
print(1 < 2) #True
print('a' == 'a') #True

###########################################

print(bool(True))    #True
print(bool(False))   #False

print(bool(1))        #True (non-zero integers are considered True)
print(bool(0))        #False (zero is considered False)

print(bool("Hello"))  #True (non-empty strings are considered True)
print(bool(""))       #False (empty strings are considered False)

print(bool([]))       #False (empty lists are considered False)
print(bool([1, 2, 3])) #True (non-empty lists are considered True)
Created at : 2024-02-01
Python Operators
| Arithmetic Operators | ||
|---|---|---|
| Example | Operation | |
| Addition (+) | a + b |
|
| Subtraction (-) | a - b |
|
| Multiplication (*) | a * b |
|
| Division (/) | a / b |
|
| Floor Division (//) | a // b |
|
| Modulus (%) | a % b |
|
| Exponentiation (**) | a ** b |
|
|
||
| Assignment Operators | ||
| Example | Operation | |
| Assignment (=) | x |
|
| Addition Assignment (+=) | x += y |
|
| Subtraction Assignment (-=) | x -= y |
|
| Multiplication Assignment (*=) | x *= y |
|
| Division Assignment (/=) | x /= y |
|
| Modulus Assignment (%=) | x %= y |
|
| Floor Division Assignment (//=) | x //= y |
|
| Exponentiation Assignment (**=) | x **= y |
|
|
||
| Comparison Operators | ||
| Example | Operation | |
| Equal (==) | p == q |
|
| Not Equal (!=) | p != q |
|
| Greater Than (>) | p > q |
|
| Less Than (<) | p < q |
|
| Greater Than or Equal (>=) | p >= q |
|
| Less Than or Equal (<=) | p <= q |
|
|
||
| Logical Operators | ||
| Example | Operation | |
| Logical AND (and) | is_true and is_false |
|
| Logical OR (or) | is_true or is_false |
|
| Logical NOT (not is_true) | not is_true |
|
|
||
| Identity Operators | ||
| Example | Operation | |
| is (list1 is list2) | list1 is list2 |
|
| is not (list1 is not list2) | list1 is not list2 |
|
|
||
| Membership Operators | ||
| Example | Operation | |
| in (x in iterable) | x in iterable |
|
| not in (x not in iterable) | x not in iterable |
|
|
||
| Bitwise Operators | ||
| Example | Operation | |
| Bitwise AND (&) | x & y |
|
| Bitwise OR (|) | x | y |
|
| Bitwise XOR (^) | x ^ y |
|
| Bitwise NOT (~) | ~x |
|
| Bitwise Left Shift (<<) | x << y |
|
| Bitwise Right Shift (>>) | x >> y |
|
|
||
Created at : 2024-02-01
Python Lists
- Python වල තනි variable එකකට data එකකට වඩා store කරන්න හැකියාව තියනවා. ඒ සඳහා අපි list, set,Tuple, Dictionary භාවිතා කරනවා.
- list එකක් නිර්මාණය කරන්නෙ
[]දෙකක් ඇතුලේ. උදාහරණයකට['apple', 'samsung', 'sony']කියන්නෙ list එකක්. - list වලටත් index numbers තියනවා. ඒ කියන්නෙ පිලිවෙලක් තියනවා.මුල්ම index එක වෙන්නේ 0. - index භාවිතා කරනවානම් අවසාන index එක -1 සහ අලුතින් item එකක් add කලොත් ඒක එකතු වෙන්නේ list එකේ අගට.
- list එකක තියන element එකක් කිහිප වරක්ම list එක ඇතුලෙ තියෙන්න පුළුවන්.
- list එකක ඕනම data type එකක data store කරන්න පුළුවන්. ඒ වගේම විවිද වර්ග වල data ත් store කරන්න පුළුවන්.
list()කියන function එක භාවිතා කරලා Tuple එකක් list එකක් කරන්න පුළුවන්.
tupleToList = list(("Car", "Bus", "Lorry"))
print(tupleToList)
Created at : 2024-02-01
Access Lists
List items වල index එකෙන් ඒවා වෙන්කරලා ගන්න විදිය බලමු.
vehicle_list = ["Car", "Bus", "Lorry", "Van", "Bike", "Lorry"]
print(vehicle_list[0]) #Car
print(vehicle_list[1:5]) #['Bus', 'Lorry', 'Van', 'Bike']
print(vehicle_list[:4]) #['Car', 'Bus', 'Lorry', 'Van']
print(vehicle_list[3:]) #['Van', 'Bike', 'Lorry']
print(vehicle_list[-5:-2]) #['Bus', 'Lorry', 'Van']
Created at : 2024-02-01
Change Lists
List items වල index එක භාවිත කරල වෙනස් කරන විදිය බලමු.
- තනි element එකක් වෙනස් කරනවානම් code line 2 විදියට value එකට සමාන කරන්න ඕන.
- 1 කට වඩා වෙනස් කරනවානම් code line 4 තියන විදියට අලුතින් වෙනස් වෙන කොටස list එකක් විදියට සමාන වෙන්න ඕන.
insert()කියන method එක හරහා list එකේ තියන elements වෙනස් නොකර අලුතින් elements අපිට ඔනේ තැනට ඇතුලත් කරන්න පුළුවන්. code line 7 බලන්න.
vehicle_list = ["Car", "Bus", "Lorry", "Van", "Bike", "Lorry"]
vehicle_list[3] = 'SUV' #code line 2
print(vehicle_list)
vehicle_list[2:4] = ['Threewheeler', 'SUV'] #code line 4
print(vehicle_list)

vehicle_list.insert(0, 'Tracktor')
print(vehicle_list)
Created at : 2024-02-01
Check Elements in List
Element, list එක ඇතුලෙ තියනවද කියල check කරන්න විදිය බලමු.
vehicle_list = ["Car", "Bus", "Lorry", "Van", "Bike", "Lorry"]

print('Bike' in vehicle_list) #True
Created at : 2024-02-01
List Methods
| Method | |
|---|---|
| append() | |
| Description | Adds an element to the end of the list. |
Example |
|
| extend() | |
| Description | Append elements from another list to the current list. |
Example |
|
| insert() | |
| Description | Inserts an element at a specified index. |
Example |
|
| remove() | |
| Description | Removes the first occurrence of a specified value. |
Example |
|
| pop() | |
| Description | Removes and returns the element at a specified index. |
Example |
|
| index() | |
| Description | Returns the index of the first occurrence of a specified value. |
Example |
|
| count() | |
| Description | Returns the number of occurrences of a specified element in the list. |
Example |
|
| sort() | |
| Description | Sorts the elements of a list in ascending order. |
Example |
|
| reverse() | |
| Description | Reverses the order of elements in the list. |
Example |
|
| clear() | |
| Description | Clears all elements in the list. |
Example |
|
| copy() | |
| Description | Copy the list. |
Example |
|
List Functions
| Function | |
|---|---|
| len() | |
| Description | Returns the number of elements in the list. |
Example |
|
| max() | |
| Description | Returns the maximum value in a list. |
Example |
|
| min() | |
| Description | Returns the minimum value in a list. |
Example |
|
| sum() | |
| Description | Returns the sum of all elements in a list. |
Example |
|
Created at : 2024-02-01
List keywords
del keyword එක අපි භාවිතා කරන්නෙ list එකක element එකක් delete කරන්න හෝ list එකම delete කරන්න.
vehicle_list = ["Car", "Bus", "Lorry", "Van", "Bike", "Lorry"]
del vehicle_list[1]
print(vehicle_list)

del vehicle_list
#print(vehicle_list)
Created at : 2024-02-01
Loops For Lists
List වලට loops භාවිතා කරන විදිය බලමු. loops ගැන ඉස්සරහට අපි කතාකරමු.
vehicle_list = ["Car", "Bus", "Lorry", "Van", "Bike", "Lorry"]
for x in vehicle_list:
  print(x)

print('----------------')

y = 0
while y < len(vehicle_list):
  print(vehicle_list[y])
  y = y + 1
මෙතනදී for loop එකේ වෙන්නේ list එක තුල තියන element එකින් එක අරන් print කරන එක. x කියල හඳුන්වල තියෙන්නේ list එක ඇතුලේ තියන elements. Loops ගැන තව ඉස්සරහට බලමු.
දෙවෙනියට තියෙන්නෙ while loop එකක්. එතනදි වෙන්නේ list එකේ length එක y ට වඩා අඩු වන තෙක් මේ loop එක වැඩ කරන එක.
Important Loop method
අපි ලබාදෙන Condition එකකට අනුව ක්රියාත්මක වෙන loop එකක් තමයි මේ තියෙන්නේ. මෙතනදි වෙන්නේ a අකුර x හි තියනවනම් x ව newlist එකට ඇතුලත් කරන එක. x කියන්නේ loop එකෙන් පිලිවෙලට ලබාගන්න vehicle_list හි තියන elements.
vehicle_list = ["Car", "Bus", "Lorry", "Van", "Bike", "Lorry"]
newlist = [x for x in vehicle_list if "a" in x]
print(newlist)
Created at : 2024-02-01
Python Tuples
- Python වල තනි variable එකකට data එකකට වඩා store කරන්න හැකියාව තියනවා. ඒ සඳහා අපි list, set, Tuple, Dictionary භාවිතා කරනවා.
- Tuple එකක් නිර්මාණය කරන්නෙ
()දෙකක් ඇතුලේ. උදාහරණයකට('apple', 'samsung', 'sony')කියන්නෙ Tuple එකක්. - Tuple වලටත් index numbers තියනවා. ඒ කියන්නෙ පිලිවෙලක් තියනවා.මුල්ම index එක වෙන්නේ 0. - index භාවිතා කරනවානම් අවසාන index එක -1.
- Tuple එකක තියන element එකක් කිහිප වරක්ම Tuple එක ඇතුලෙ තියෙන්න පුළුවන්.
- Tuple එකක ඕනම data type එකක data store කරන්න පුළුවන්. ඒ වගේම විවිද වර්ග වල data ත් store කරන්න පුළුවන්.
- Tuple එකක් අපිට වෙනස් කරන්න බැහැ. add, remove වගේ දේවල් අපිට කරන්න බැහැ..
- Tuple වෙනස් කරන්න බැරි වුනත් අපිට පුළුවන් list වෙනස් කරන්න. අන්න ඒ නිසා අපි tuple එකක් list එකකට පරිවර්තනය කරගෙන ඊට පස්සෙ කල යුතු වෙනස්කම් කරලා නැවත tuple එකක් බවට හරවනවා. ඒකට අපි
tuple()method එක භාවිතා කරනවා.
tupleToList = list(("Car", "Bus", "Lorry"))
print(tupleToList) #['Car', 'Bus', 'Lorry']

listToTuple = tuple(("Car", "Bus", "Lorry"))
print(listToTuple) #('Car', 'Bus', 'Lorry')
Created at : 2024-02-01
Access Tuples
Tuple items වල index එකෙන් ඒවා වෙන්කරලා ගන්න විදිය බලමු.
vehicle_list = ("Car", "Bus", "Lorry", "Van", "Bike", "Lorry")
print(vehicle_list[0]) #Car
print(vehicle_list[1:5]) #('Bus', 'Lorry', 'Van', 'Bike')
print(vehicle_list[:4]) #('Car', 'Bus', 'Lorry', 'Van')
print(vehicle_list[3:]) #('Van', 'Bike', 'Lorry')
print(vehicle_list[-5:-2]) #('Bus', 'Lorry', 'Van')
Created at : 2024-02-01
Join Tuples
Tuple දෙකක් join කරන විදිය බලමු.
tuple1 = ("a", "b" , "c")
tuple2 = (1, 2, 3)

tuple3 = tuple1 + tuple2
print(tuple3)
Created at : 2024-02-01
Multiply Tuples
Tuples ගුණ කරන විදිය බලමු.
tuple1 = ("a", "b" , "c")
tupleX = tuple1 * 2
print(tupleX)  #("a", "b" , "c", "a", "b" , "c")
Created at : 2024-02-01
Check Elements in Tuples
Element, tuple එක ඇතුලෙ තියනවද කියල check කරන්න විදිය බලමු.
vehicle_tuple = ("Car", "Bus", "Lorry", "Van", "Bike", "Lorry")

print('Bike' in vehicle_tuple) #True
Created at : 2024-02-01
Tuple Methods & Functions
| Method | |
|---|---|
| index() | |
| Description | Returns the index of the first occurrence of a specified value. |
Example |
|
| count() | |
| Description | Returns the number of occurrences of a specified element in the tuple. |
Example |
|
Created at : 2024-02-01
Loops For Tuples
Tuples වලට loops භාවිතා කරන විදිය බලමු. loops ගැන ඉස්සරහට අපි කතාකරමු.
vehicle_tuple = ("Car", "Bus", "Lorry", "Van", "Bike", "Lorry")
for x in vehicle_tuple:
  print(x)

print('----------------')

y = 0
while y < len(vehicle_tuple):
  print(vehicle_tuple[y])
  y = y + 1
Created at : 2024-02-01
Python Sets
- Python වල තනි variable එකකට data එකකට වඩා store කරන්න හැකියාව තියනවා. ඒ සඳහා අපි list, set, Tuple, Dictionary භාවිතා කරනවා.
- Set එකක් නිර්මාණය කරන්නෙ
{}දෙකක් ඇතුලේ. උදාහරණයකට{'apple', 'samsung', 'sony'}කියන්නෙ Set එකක්. - Set වලට index numbers නැහැ. පිලිවෙලකුත් නැහැ.
- Set එකක තියන element එක් වරක් පමණක් තිබිය යුතුයි. කිහිප වරක් තුබුණොත් එහි වැඩිපුර ඇති elments නොසලකා හරී.
- තවද
Trueසහ1එකම value එකක් ලෙසද.Falseසහ0එකම value එකක් ලෙසද සලකයි.
vehicle_set = {"Car", "Bus", "Lorry", "Van", "Bike", "Lorry", True, 1, False, 0}
print(vehicle_set) #{"Car", "Bus", "Lorry", "Van", "Bike", True}
- Set එකක ඕනම data type එකක data store කරන්න පුළුවන්. ඒ වගේම විවිද වර්ග වල data ත් store කරන්න පුළුවන්.
- Set එකක් අපිට වෙනස් කරන්න බැරි වුනත් add, remove වගේ දේවල් අපිට කරන්න පුළුවන්.
Created at : 2024-02-01
Check Elements in Sets
Element, set එක ඇතුලෙ තියනවද කියල check කරන්න විදිය බලමු.
vehicle_set = {"Car", "Bus", "Lorry", "Van", "Bike", "Lorry"}

print('Bike' in vehicle_set) #True
Created at : 2024-02-01
Set Methods & Functions
| Method | |
|---|---|
| add() | |
| Description | add an elemnt to set. |
Example |
|
| update() | |
| Description | add elements from another set, tuple, etc., to the current set. |
Example |
|
| clear() | |
| Description | clear all elements from the set. |
Example |
|
| copy() | |
| Description | Returns a copy of the set. |
Example |
|
| remove() / discard() | |
| Description | Remove an element from the set. |
Example |
|
| union() | |
| Description | Get the union of two sets. |
Example |
|
| intersection() | |
| Description | Get the intersection of two sets. |
Example |
|
| intersection_update() | |
| Description | Get the intersection of two sets and update the original set with the result. |
Example |
|
| symmetric_difference() | |
| Description | Get the items that are not present in both sets. |
Example |
|
| symmetric_difference_update() | |
| Description | Get the items that are not present in both sets and update the original set with the result. |
Example |
|
| difference() | |
| Description | Returns the difference between two sets. |
Example |
|
| difference_update() | |
| Description | Returns the difference between two sets and updates the original set with the result. |
Example |
|
| isdisjoint() | |
| Description | Returns True if none of the items are present in both sets, otherwise it returns False. |
Example |
|
| issubset() | |
| Description | Returns True if all items in the set exist in the specified set, otherwise it returns False. |
Example |
|
| issuperset() | |
| Description | Returns True if all items in the specified set exist in the original set, otherwise it returns False. |
Example |
|
del keyword එකද භාවිත කල හැකිය.
Note
remove()භාවිතා කරන විට ඉවත් කිරීමට element එකක් නොමැතිනම් ගැටලුවක් මතු වේ. නමුත්discard()වලදී එහෙම වෙන්නේ නෑ.symmetric_difference_update(),difference_update()සහintersection_update()භාවිතා කරන මුල් set එක update වන අතර වෙනත් set එකක් නිර්මණය නොවේ.
Created at : 2024-02-01
Loops For Sets
Sets වලට loops භාවිතා කරන විදිය බලමු. loops ගැන ඉස්සරහට අපි කතාකරමු.
vehicle_set = {"Car", "Bus", "Lorry", "Van", "Bike", "Lorry"}
for x in vehicle_set:
  print(x)
Created at : 2024-02-01
Python Dictionaries
- Python වල තනි variable එකකට data එකකට වඩා store කරන්න හැකියාව තියනවා. ඒ සඳහා අපි list, set, Tuple, Dictionary භාවිතා කරනවා.
- Dictionary එකක් නිර්මාණය කරන්නෙත්
{}දෙකක් ඇතුලේ. උදාහරණයකට{'firstName' : 'Harshani','lastName' : 'Dilini', 'Age' : 22}කියන්නෙ Dictionary එකක්. - Dictionary වලට index numbers වෙනුවට අපි key:value යුගලය තමයි භාවිතා කරන්නේ. පිලිවෙලක් තියනවා.
- Dictionary එකක එකම key එක කිහිප වරක් නොතිබිය යුතුයි.
- Dictionary එකක ඕනම data type එකක data store කරන්න පුළුවන්. ඒ වගේම විවිද වර්ග වල data ත් store කරන්න පුළුවන්.
- Dictionary එකක් අපිට වෙනස් කරන්න පුළුවන්.
Dictionary එකකට උදාහරණයක් බලමු.
dict =  {
  'firstName' : 'Nimantha',
  'lastName' : 'Thennakoon',
  'Age' : 25
}
print(dict) # {'firstName': 'Nimantha', 'lastName': 'Thennakoon', 'Age': 25}
print(dict["lastName"]) #Thennakoon
Created at : 2024-02-01
Check Keys in Dictionaries
key එකක්, dictionary එක ඇතුලෙ තියනවද කියල check කරන්න විදිය බලමු.
dict = {'firstName': 'Harshani', 'lastName': 'Dilini', 'Age': 22}

print('firstName' in dict) #True
Created at : 2024-02-01
Python if elif else
Python වල comparison operators ඔයාට මතක ඇති. අන්න ඒවා භාවිතා කරලා මේ if elif සහ else ගැන කතා කරමු. Statement එකක් හරිනම් හෝ වැරදිනම් හෝ එසේ නැතිනම් මෙහෙම කරන්න කියල කියන Condition 3ක් තමයි අපි මෙතනින් කතාකරන්නේ.
උදාහරණයක් බලමු. ලකුණු වලට grade එකක් දෙන විදියට ලකුණු 75 <= 'A' , 65 <= 'B', 55 <= 'C', 45 <= 'S' , 35 > 'F' කියන statement එක අපි උත්සාහ කරමු. මෙතදි ලියලා තියෙන්නෙ 75 ට වැඩිනම් හෝ සමානනම් A, 65 ට වැඩිනම් හෝ සමානනම් B, 55 ට වැඩිනම් හෝ සමානනම් C, 45 ට වැඩිනම් හෝ සමානනම් S, 35 ට අඩුනම් F කියන grades ලැබෙන විදියට.
mark = int(input('Enter your mark : '))

if mark >= 75:                  # code line 3
    print('Grade is : A')
elif mark >= 65:                # code line 5
    print('Grade is : B')
elif mark >= 55:                # code line 7
    print('Grade is : C')
elif mark >= 45:                # code line 9
    print('Grade is : S')
else:                           # code line 11
    print('Grade is : F')
Note
input()function එක භාවිතා කරලා අපිට පුළුවන් කිසියම් දෙයක් input කරන්න.මෙතනදි කරලා තියෙන්නේ mark කියන variable එකට අපිට කැමති අගයක් input කරන්න දීලා. int() කියන එක ඇතුලෙinput()function එක තියෙන්නේ mark කියන්නෙ integer එකක් වෙන්න ඕනෙ නිසා.- if statement එකකදි
:ට යටින් එන කොටස tabspace එකක් ඉස්සරහින් type කරන්න ඔනේ. නැත්තම් error එකක් එනවා.. ඒ error වර්ගයට අපි කියන්නෙ Indentation Error කියලා.
code line 3 දි අපි කරන්නෙ mark කියන variable එකේ අගය 75ට විශාල හෝ සමාන වෙනවද කියල බලන එක. එහෙම වෙනවන්ම්, ඒ කියන්නෙ ඒ statement එක True වෙනවනම් if වලට අදාල code block එක execute වෙනවා. එහෙම නැතිව False උනොත් ඒක මගහරිනවා. ඒ විදියට if ට අදාල statement එක false වෙලා ඒ පියවර skip කරලා ඊලඟට elif වල තියන statement එකට යනවා. ඒ විදියට තියන හැම statement එකම check කරගෙන ගිහින් ඒ හැම එකම False උනොත් else කියන එකට අදාල code block එක execute වෙනවා.
Created at : 2024-02-01
Short Methods for if & else
mark = int(input('Enter your mark: '))
grade = 'A' if mark >= 75 else 'B' if mark >= 65 else 'C' if mark >= 55 else 'S' if mark >= 45 else 'F'
print(f'Grade is: {grade}')
මෙතනදී වෙන්නේ මුලින්ම input කරන value එකට අදාලව එන grade එක grade කියල variable එකකට store කරන එක.'A' if mark >= 75 මෙතන කියන්නේ grade එක 'A' වෙන්නේ mark >= 75 නම් කියන එක. ඊට ඉස්සරහින් තියන else එකෙන් අපි කරන්නේ ඊලඟ satatement එක True ද False ක කියලා check කරන එක. ඒ විදියට දිගටම කරන් යන්න පුළුවන්.
Created at : 2024-02-01
AND OR NOT
and, or ,not කියන්නෙ logical operators.
- and = සහ
- or = හෝ
- not = condition එකේ ප්රතිවිරුද්ධ දෙය.
a = 50
b = 30
c = 80

if a>b and b>c:
  print('a>b and b>c True')
else:
  print('one or both conditions are False')

if a>b or b>c:
  print('a>b or b>c True')
else:
  print('both conditions are False')

if not b>c:
  print('b>c False')
else:
  print('b>c True')
Created at : 2024-02-01
Nested if
Nested if කියන්නෙ if statement එකක් තුල තියෙන if statements. nested loop කියන්නෙත් ඒ වගේම දෙයක්.
print('If you pass test 1, you can qualify for test 2, if you pass test 2, you can qualify for test 3.')

test1 = int(input('Enter your test1 mark : '))

if test1 >=45:
    print('You have qualified for test 2')
    test2 = int(input('Enter your test2 mark : '))
    if test2 >=45:
        print('You have qualified for test 3')
        test3 = int(input('Enter your test3 mark : '))
        if test3 >=45:
            print('You have passed all tests')
        else:
            print('You have not passed test 3')
    else:
        print('You have not qualified for test 3')

else:
    print('You have not qualified for test 2')
Created at : 2024-02-01
Pass Statement
if statement එකක් භාවිතා කරන විට එහි අන්තර්ගතය හිස් නොවිය යුතුය. නමුත් එසේ කිරීමට දෙයක් නොමැතිනම් pass statement එක භාවිතා කර පැමිණෙන දෝශය මගහැරිය හැකිය. එහිදී කිසිවක් නොවී if statement එක ක්රියා කරයි.
Created at : 2024-02-01
Python While Loops
කිසියම් condition එකක් true වෙන තෙක් while loop ක්රියා කරනවා.
i = 1
while i < 5:
  print(i)
  i += 1 # code line 4
මෙතනදී i=1 වන අතර i 5ට කුඩා වන තෙක් loop එක ක්රියා කරයි. මුලින් 1 print වී code line 4 දී i හි අගය 1 කින් වැඩි වී loop එක නැවත ක්රියා කරයි.
else
while loop එකෙහි ඇති condition එක false වෙනවන්ම් else වලට අදාල code block එක ක්රියා කරයි.
i = 1
while i < 5:
  print(i)
  i += 1 # code line 4
else:
  print("i => 5")
break
loop එක නතර කරන්න ඕනනම් අපි break statement එක භාවිතා කරනවා.
i = 1
while i < 5:
  print(i)
  if i == 3:
    break
  i += 1 # code line 6
else:
  print("i => 5")
මෙතනදී 1, 2, 3 වන තෙක් print වී නතර වේ.
i = 1
while i < 5:
  print(i)
  i += 1 # code line 4
  if i == 3:
    break

else:
  print("i => 5")
Note
- මෙතන
i += 1යෙදෙන තැන අනුව loop එක නතර වෙන තැන වෙනස් වෙනවා. දෙවෙනි උදාහරණෙදී 1, 2 ට පැමිණ loop එක නතර වෙනවා. i = 3 වෙද්දී loop එක නතර වෙන්න තියෙද්දි ඇයි 2ට එනකම් විතරක් print වෙන්නේ. හිතලා බලන්න වෙන දේ.( i = 3 දී තමයි loop එක නතර වෙන්නේ )
continue
මෙතනදි වෙන්නේ අපි දෙන condition එක ලැබුණු පසු එය මගහැර loop එක ක්රියා කිරීමයි.
i = 0
while i < 5:
  i += 1 # code line 3
  if i == 3:
    continue
  print(i)

else:
  print("i => 5")
i = 3 වූ විට එම වටය මගහැර ඊලඟ වටය ක්රියාත්මක වේ. ඒ හේතුවෙන් 3 print නොවේ.
Created at : 2024-02-01
Python for Loops
- For loops කිසියම් ප්ලිවෙලක ඇති දේවල් ලබාගැනීමට භාවිතා කරයි. tuple, dictionary, list වලදී භාවිතා කරනවා..
- While loop වල මෙන්ම for loop වලද continue සහ break statement ඇත.
vehicle_list = {"Car", "Bus", "Lorry", "Van", "Bike", "Lorry"}
for x in vehicle_list:
  print(x)
vehicle_list තුල ඇති elements x නම් පිලිවෙලින් x print කරන්න. වගේ තේරුමක් තමයි මෙතනදි කියවෙන්නේ.
vehicle_list = {"Car", "Bus", "Lorry", "Van", "Bike", "Lorry"}
for x in vehicle_list:
  print(x)
  if x == "Lorry":
    break
vehicle_list තුල ඇති elements වලින් x == "Lorry" වූ විට loop එක නතර වේ.
vehicle_list = {"Car", "Bus", "Lorry", "Van", "Bike", "Lorry"}
for x in vehicle_list:
  print(x)
  if x == "Lorry":
    continue
vehicle_list තුල ඇති elements වලින් x = "Lorry" වූ විට loop එය මගහැර යයි.
range() Function
range() function එකෙන් කරන්නේ නිශ්චිත වාර සංඛ්යාවක් loop එක ක්රියාත්මක කරන එක.
for x in range(6):
  print(x)
range(6) function එකෙන් කරන්නේ වාර 6ක් loop එක ක්රියාත්මක කරන එක. ඒ වගේම මෙතනදි අදාල වාරයට අදාල අංකර print කරලා තියනවා. මුල්ම වාරය සඳහන් නොකලහොත් එය 0 ලෙස පවතී. ඒ වගේම පියවර 1න් 1ට තමයි වැඩි වෙන්නේ. එවිට 0, 1, 2, 3, 4, 5 ලෙස output එක දැකගතහැකිය.
for x in range(2, 6):
  print(x)
range(2, 6) ලෙස දක්වා ඇති විට. loop එක ආරම්භ කල යුතු වාරයට අදාල අංකය 2 ලෙස සැකසිය හැකිය. ඒ වගේම 6 දක්වා loop එක ක්රියාත්මක වේ. නමුත් 6 print නොවේ. මොකද වාර 4ක් යනු 2, 3, 4, 5 නිසා.
for x in range(2, 6, 2):
  print(x)
range(2, 6, 2) තුන් වෙනියට 2ක් යොදලා තියෙන්නේ පියවර සංඛ්යාව දක්වන්න. මෙතනදි 2න් 2ට තමයි ක්රියාත්මක වෙන්නේ. output එක 2, 4
Else
for x in range(6):
  print(x)
else:
  print('finish')
For loop එක ක්රියා කර අවසන් වූ විට else ක්රියාත්මක වේ. නමුත් break statement එක භාවිතා කලොත් else statement එක ක්රියාත්මක වෙන්නේ නැහැ.
Nested Loop
Loop එකක් ඇතුලෙ තියන loop වලට nested loop කියනවා.
vehicle_list = ["Car", "Bus", "Lorry", "Van", "Bike", "Lorry"]
vehicle_brand = ["Toyota", "Mazda", "Hino"]
for x in vehicle_list:
  for y in vehicle_brand:

      print(y , x)
loop දෙකෙන් අතුලෙ තියන loop එක සහ පිටත තියන loop එක විදියට මේ loop දෙක මතක තියා ගමු. හැම වෙලාවෙම පටන් ගත්ත loop එකක් ඉවර වෙනකම් ක්රියාත්මක වෙනවා. මෙතන පිටින් තියන loop එක වෙන්නේ vehicle_list එකට අදාල loop එක සහ ඇතුලෙ තියන loop එක වෙන්නේ vehicle_brand කියන loop එක. පිටින් තියන loop එකෙන් vehicle type එක අරන් ඊට පස්සේ ඇතුලෙ තියන loop එකෙන් vehicle brand එක ගන්නවා. නමුත් brand 3ක් තියනවා. එහෙනම් ඇතුලෙ තියන loop එක 3න් පාරක් ක්රියා කරනවා. පලවෙනි x ට y 3ක් විදියට output එක ලැබෙනවා. Toyota Car , Mazda Car , Hino Car විදියට තමයි පිටත loop එකේ පලවෙනි වටය සම්පූර්ණ වෙන්නේ. පිටත loop එකේ පලවෙනි වටය ක්රියාකරන විට ඇතුලෙ loop එකේ වට 3ක් සම්පූර්ණ වෙනවා.
pass statement
For loop එකක් පටන් අරන් ඒක නිකන් හිස්ව තියන්න බැහැ. නමුත් loop එකෙන් කරන්න දෙයක් නැතිනම් අපි pass statement එක භාවිතා කරනවා.
Created at : 2024-02-01
Python Functions
Function එකක් කියන්නේ අවසර දුන්නාම ක්රියාත්මක කරවන්න පුළුවන් code block එකක්.
Fev Defenetions (අර්ථ දැක්වීම් කිහිපයක්)
- Call a Function - Function එකක් ක්රියා කරවීම.
- Parameter / Arguments - Function එකට ලබාදෙන දත්ත.
Function එකක් අපි def keyword එකෙන් හඳුන්වනවා.
def the_function():
  print("you called the function")

the_function() # code line 4
code line 4 දි the_function() කියලා තියෙන්නේ ඒ function එකට call කරලා.
Parameter / Arguments
Parameter කියන්නේ function එක ඇතුලේ වරහන් ඇතුලෙ සඳහන් කරන variable. Arguments කියන්නේ function එකට call කරන විට එයට යවන අගයන්.
def name_function(name):
  print('I am ' + name)

name_function('Nimantha') # I am Nimantha
name_function('Harshani') # I am Harshani
ඒ වගේම Arguments කිහිපයක් එක වර දෙන්න පුළුවන්.
def name_function(name, age):
    print('I am ' + name + ' and ' + str(age) + ' years old.')

name_function('Nimantha', 24)  # Output: I am Nimantha and 24 years old.
name_function('Harshani', 22)  # Output: I am Harshani and 22 years old.
*args (Arbitrary Arguments)
අපි ලබාදෙන argument ගණන හරියටම දන්නේ නැතිතම් අපි * සලකුණ parameter එකට කලින් එකතු කරනවා.
def name_function(*name):
    print('I am ' + name[0])

name_function('Nimantha', 'Harshani')  # Output: I am Nimantha
Keyword Arguments
Key එකට අදාල value එකක් විදියට Arguments ලබාදෙන්න පුළුවන්. (Key = 'Value')
def name_function(name1, name2):
    print('I am ' + name1)

name_function(name1 = 'Nimantha', name2 = 'Harshani')  # Output: I am Nimantha
**kwargs (Arbitrary Keyword Arguments)
එතනදිත් ලබාදෙන argument ගණන දන්නේ නැතිනම් ** parameter එකෙහි මුලින් එකතුකරන්න පුළුවන්.
def name_function(**name):
    print('I am ' + name["name1"])

name_function(name1 = 'Nimantha', name2 = 'Harshani')  # Output: I am Nimantha
Default Parameter Value
Argument එකක් ලබා නොදෙන අවස්තාවකදී parameter එකට යම් අගයක් ලබා දී තිබීම මෙමගින් සිදු කරනවා. Argument එකක් ලබා දුන් විට එම අගය ඉබේම වෙනස් වේ.
def name_function(name = 'Steve'):
    print('I am ' + name)

name_function('Nimantha') # Output: I am Nimantha
name_function('Harshani') # Output: I am Harshani
name_function()  # Output: I am Steve
Return Value
Function එකෙන් අපිට ලබාගන්න ඕන අගය ලබාගන්න තමයි return statement එක භාවිතා කරන්නේ.
import math

def the_function(x):
    root = math.sqrt(x)

    return root

result = the_function(36)
print(result) # 6.0
මෙතනදී return කරන්නේ root කියන value එක. ඒක result කියන variable එකට store කරලා ඊට පස්සෙ print කරනවා.
Note
කෙලින්ම print කරන්න පුළුවන්කම තියෙද්දි ඇයි return භාවිතා කරන්නේ. මෙතන උදාහරණයේදී print කලත් අපිට return කරන දෙයින් කිසියම් ප්රයෝජනයක් ගන්න පුළුවන්. උදාහරණයකට True / False වගේ දෙයක් පරීක්ශා කරන්න.Pass Statement
Function එකක් හිස්ව තියන්න බැහැ. ඒ pass statement එක භාවිතා කරනවා.
def the_function():
    pass
examples
සමීකරණයක මූලය හොයන්න හදපු function දෙකක් තමයි යටින් තියෙන්නේ. ගණිතය ආශ්රිත දේවල් කරන්න අපිට math / cmath කියල Module එක import කරන්න වෙනවා.
Fev Defenetions (අර්ථ දැක්වීම් කිහිපයක්)
- Module - අපේ Application එකට ඇතුළත් කිරීමට අවශ්ය කාර්යයන් සමූහයක් අඩංගු ගොනුවක්. (Library කියලත් කියනවා)
import mathකියන විදියට තමයි import කරන්නේ.
import math

def the_function(a, b, c):
    root_1 = (-b + math.sqrt((b * b) - (4 * a * c)))/2*a
    root_2 = (-b - math.sqrt((b * b) - (4 * a * c)))/2*a

    print(" Root 1:", root_1, '\n', "Root 2:", root_2)

the_function(1, -7, 10) # Output:  Root 1: 5.0
                        # Output:  Root 2: 2.0
import cmath

def the_function(a, b, c):
    root_1 = (-b + cmath.sqrt((b * b) - (4 * a * c)))/2*a
    root_2 = (-b - cmath.sqrt((b * b) - (4 * a * c)))/2*a

    print(" Root 1:", root_1, '\n', "Root 2:", root_2)

the_function(5, -7, 10) # Output:  Root 1: (17.5+30.72051431861127j)
                        # Output:  Root 2: (17.5-30.72051431861127j)
සාමන්ය ගණිතය තියෙනවානම් math භාවිතා කරනවා, සංකීර්ණ සංඛ්යා තියෙනවනම් cmath භාවිතා කරනවා.
Created at : 2024-02-01
File Handling
File handling වලදී අපි file එකක් read, write, append කිරීම සඳහා mode කිහිපයක් ගැන කතා කරනවා. යටින් තියන උදාහරණය බැලුවම ඒ ගැන අදහසක් ගන්න පුලුවන්.
Note
මෙතනදී mode කියලා කියන්නේ මෙතනදී භාවිතා කරන methods වලට. මෙතනදී open() කියන function එක තමයි අපි භාවිතා කරන්නේ. ඒ function එක mode කිහිපයකින් භාවිතා කරනවා.
file = open('example.txt', 'r')   # Opens in read mode
file = open('example.txt', 'w')   # Opens in write mode
file = open('example.txt', 'a')   # Opens in append mode
file = open('example.txt', 'r+')  # Opens in read and write mode
file = open('image.jpg', 'rb')   # Opens a binary file in read mode
open() function එකට අපි parameters දෙකක් දෙනවා. මුලින්ම filename එක සහ දෙවෙනියට mode එක.open(filename, mode)
Created at : 2024-02-01
Read Mode(r)
මෙතනදි කතා කරන්නේ file එකක් කියවන විදිය ගැන. ඒත් මෙතනදි හරියටම වෙන්නේ file එකක් read කිරීම සඳහා open කරන එක. අපි open කරන file එක තිබුනෙ නැති වුනොත් error එකක් එනවා. ඒ නිසා අනිවාර්යයෙන් file එක තියෙන්න ඕනේ.
example.txt
Pelé: The Footballing Legend Who Defined an Era

Pelé, born Edson Arantes do Nascimento, is widely regarded as one of the greatest footballers in history. Hailing from Brazil, he became an iconic figure in the world of soccer due to his exceptional skill, agility, and goal-scoring prowess. His career spanned nearly two decades, during which he mesmerized audiences with his breathtaking dribbling, precise passing, and remarkable goal-scoring ability. Pelé's talent and charisma extended beyond the field, elevating him to a global sporting legend and an ambassador for the beautiful game. With numerous accolades, including multiple FIFA World Cup victories with the Brazilian national team, Pelé's impact on football remains indelible, inspiring generations of players and fans alike.
file = open('example.txt', 'r') #code line 1
content = file.read()
print(content) # code line 3
file.close()
මෙතනදි උඩින් දීලා තියන example.txt එක භාවිතා කරනවා කියල හිතමු. මෙතනදී python file එක සහ example.txt file එක එකම තැනක තියෙන්න ඕන. නැතිනම් example.txt file එක තියන තැන නිවැරදිව සඳහන් කරන්න ඕන.
මෙතනදී example.txt එක read mode එකෙන් open කරලා file කියන object එකට ගන්නවා. මේ object එක අපිට කියවන්න විතරයි භාවිතා කරන්න පුලුවන්. ඊට පස්සේ read() method එක භාවිතා කරලා අපි example.txt file එක කියවලා content කියන variable එකේ store(ගබඩා ) කරනවා.
ඊට පස්සෙ code line 3 හි තියන විදියට content variable එක print කරනවා. අවසානයේදී open කරපු file එක close() කියන method එක හරහා close කරගන්නවා.
Created at : 2024-02-01
Write Mode(w)
මෙතනදි කතා කරන්නේ file එකක දෙයක් ලියන විදිය ගැන. මෙතනදී example.txt file එක open කරන්නේ write mode එකෙන්. බැරි වෙලාවාත් ඒ අදාල නමින් file එකක් තිබුනෙ නැතිනම් අලුතින් file එකක් හැදෙනවා. ඒ වවගේම file එක open කරාම ඒකෙ මොනවාහරි තිබුනොත් ඒකෙ තියන ඔක්කෝම මැකිලා අලුතින් තමයි ලියවෙන්නේ.
file = open('example.txt', 'w')
file.write('Hello, this is a sample text.')
file.close()
මෙතනදිත් කලින් තිබුණු example.txt එකම භාවිතා කරනවා කියල හිතමු. මෙතනදීත් python file එක සහ example.txt file එක එකම තැනක තියෙන්න ඕන. නැතිනම් example.txt file එක තියන තැන නිවැරදිව සඳහන් කරන්න ඕන.
මෙතනදී example.txt එක write mode එකෙන් open කරලා file කියන object එකට ගන්නවා. මේ object එක අපිට ලියන්න විතරයි භාවිතා කරන්න පුලුවන්. ඊට පස්සේ write() method එක භාවිතා කරලා අපි example.txt file එකේ 'Hello, this is a sample text.' string එක ලියනවා.
අවසානයේදී open කරපු file එක close() කියන method එක හරහා close කරගන්නවා. අවසාන output එක යටින් තියෙනවා.
Hello, this is a sample text.
Created at : 2024-02-01
Append Mode(a)
මෙතනදිත් කතා කරන්නේ file එකක දෙයක් ලියන විදිය ගැන. මෙතනදී example.txt file එක open කරන්නේ append mode එකෙන්. බැරි වෙලාවාත් ඒ අදාල නමින් file එකක් තිබුනෙ නැතිනම් අලුතින් file එකක් හැදෙනවා. ඒ වවගේම file එක open කරාම ඒකෙ මොනවාහරි තිබුනොත් ඒකෙ තියන දේවල් තියෙද්දිම අවසානයේ ඉඳන් අලුතින් ලියවෙන්නේ.
file = open('example.txt', 'a')
file.write('\nThis is appended text.')
file.close()
මෙතනදිත් කලින් තිබුණු example.txt එකම භාවිතා කරනවා කියල හිතමු. මෙතනදීත් python file එක සහ example.txt file එක එකම තැනක තියෙන්න ඕන. නැතිනම් example.txt file එක තියන තැන නිවැරදිව සඳහන් කරන්න ඕන.
මෙතනදී example.txt එක append mode එකෙන් open කරලා file කියන object එකට ගන්නවා. මේ object එක අපිට ලියන්න විතරයි භාවිතා කරන්න පුලුවන්. ඊට පස්සේ write() method එක භාවිතා කරලා අපි example.txt file එකේ '\nThis is appended text.' string එක ලියනවා.
අවසානයේදී open කරපු file එක close() කියන method එක හරහා close කරගන්නවා. අවසාන output එක තමයි යටින් තියෙන්නේ.
Pelé: The Footballing Legend Who Defined an Era

Pelé, born Edson Arantes do Nascimento, is widely regarded as one of the greatest footballers in history. Hailing from Brazil, he became an iconic figure in the world of soccer due to his exceptional skill, agility, and goal-scoring prowess. His career spanned nearly two decades, during which he mesmerized audiences with his breathtaking dribbling, precise passing, and remarkable goal-scoring ability. Pelé's talent and charisma extended beyond the field, elevating him to a global sporting legend and an ambassador for the beautiful game. With numerous accolades, including multiple FIFA World Cup victories with the Brazilian national team, Pelé's impact on football remains indelible, inspiring generations of players and fans alike.
This is appended text.
Created at : 2024-02-01
Create Mode(x)
මෙතනදිත් කතා කරන්නේ file එකක් නිර්මාණය කරන විදියක් ගැන. මෙතනදී example_2.txt නමින් file එකක් නිර්මාණය වෙනවා. බැරි වෙලාවාත් ඒ අදාල නමින් file එකක් තිබුනොත් error එකක් එනවා.
file = open('example_2.txt', 'x')
file.close()
මෙතනදි example_2.txt නමින් file එකක් නිර්මාණය කරලා අවසානෙදී ඒ open කරපු file එක close කරලා දානවා.
GUI - Tkinter
Created at : 2024-02-01
Tkinter
Fev Defenetions (අර්ථ දැක්වීම් කිහිපයක්)
GUI - Graphical User Interface.
කෙනෙක්ට භාවිතා කිරීමේ පහසුව සඳහා අපේ program එකට අතුරු මුහුණතක් ලබාගන්න විදිය ගැන තමයි මෙතනින් කතාකරන්නේ. ඒකට අපිට tkinter, wxPython, JPython වගේ library භාවිතා කරන්න පුලුවන්. library එකක් කියන්නෙ සරලව, කලින් ලියලා තියන code, function වගේ දේවල් වල එකතුවක්.
අපි මුලින්ම අපේ window එක හදාගන්න විදිය බලමු.
Created at : 2024-02-01
Tkinter - Window
import tkinter as tk

root = tk.Tk()
root.mainloop()
Output :

ඒක වෙන විදිය බලමු දැන්.
මුලින්ම අපි tkinter module එක import කරගන්න ඕන tk කියන නමින්. කැමති නමක් භාවිතා කරන්න පුලුවන් tk වෙනුවට. නමුත් සම්මුතියක් විදියට අපි tk කියන නම භාවිතා කරනවා.
දෙවෙනියට අපේ window එක නිර්මාණය කරගන්න ඕන. ඒකටත් අපි සම්මුතියක් විදියට root කියන නම භාවිතා කරනවා. window / main වැනි නමක් උනත් භාවිතා කරන්න පුලුවන්.
තුන් වෙනියට තියෙන්නෙ mainloop() කියන method එකට call කරලා. මේකෙන් තමයි අපේ program එක දිගින් දිගටම ක්රියාත්මක වෙමින් තියෙන්නේ. නැතිනම් මේ program එක එක සැරයක් ක්රියාත්මක වෙලා නැති වෙලා යනවා.
Created at : 2024-02-01
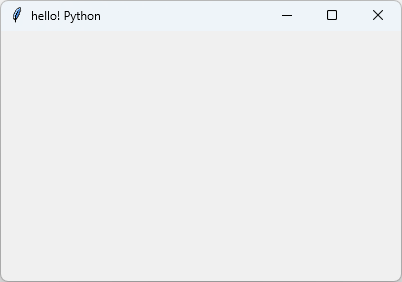
Tkinter - Window title
import tkinter as tk

root = tk.Tk()
root.title('hello! Python')

root.mainloop()
Output :
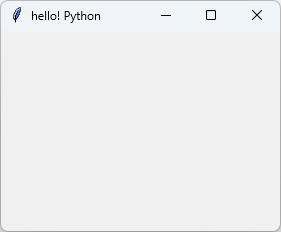
title() method එක භාවිතා කරලා අපිට window එකට නමක් දෙන්න පුලුවන්.
Created at : 2024-02-01
Tkinter - Window geometry
import tkinter as tk

root = tk.Tk()
root.title('hello! Python')
root.geometry('400x250+700+350')

root.mainloop()
Output :
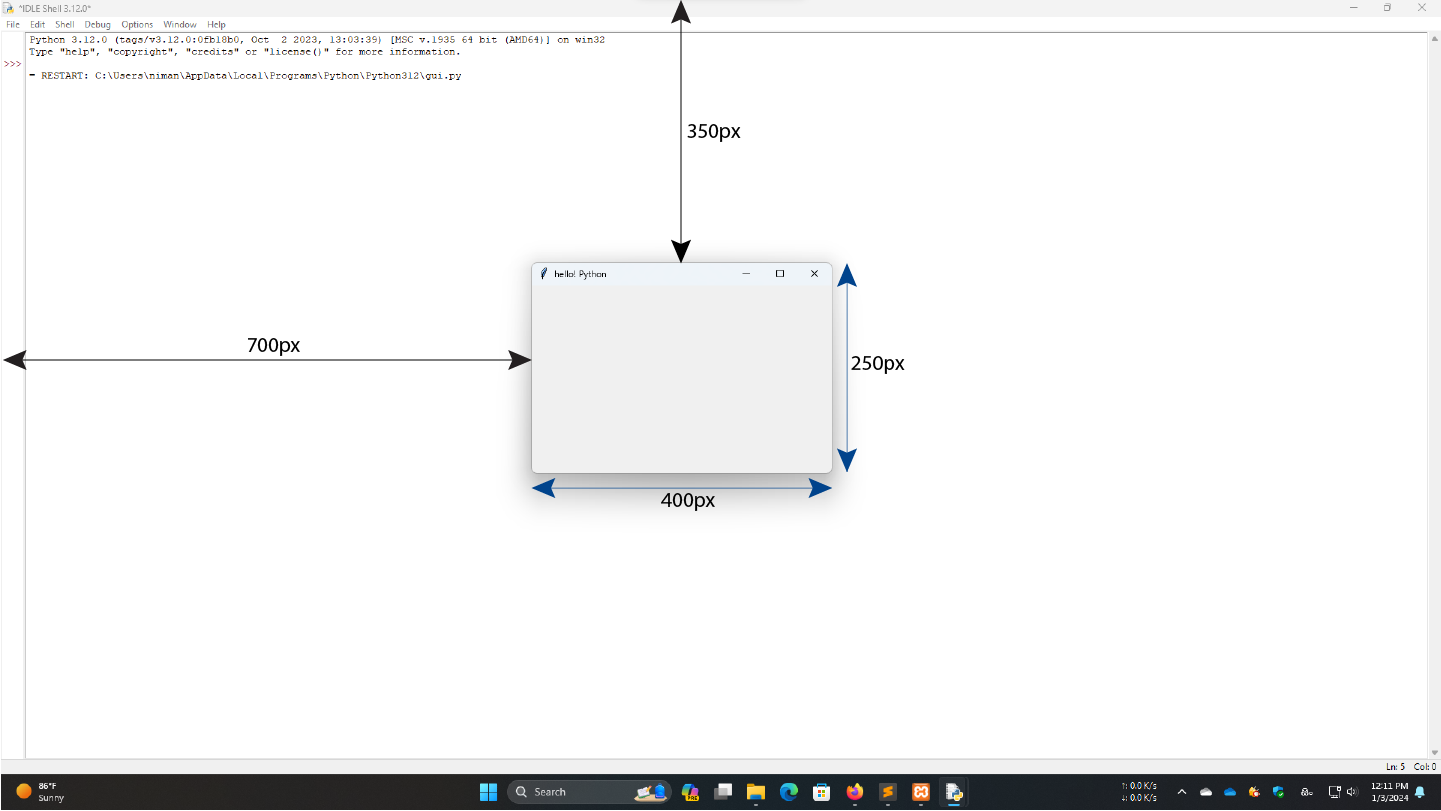
geometry() method එක භාවිතා කරලා අපිට window එකේ ප්රමාණය සහ පිහිටීම වෙනස් කරන්න පුලුවන්. 400x250 කියලා මුලින් තියෙන්නේ window එකේ පළල සහ උසය (පළල = 400 pixels, උස = 250 pixels). ඊට පස්සේ තියෙන්නේ window එකේ පිහිටීම. +700+350 කියලා තියෙන්නේ පිළිවෙලින් computer screen එකේ වම් කෙලවරේ සිට window එකේ වම් කෙලවරට තියන දුර සහ computer screen එකේ උඩ කෙලවරේ සිට window එකේ උඩ කෙලවරට තියන දුර. ඒ නිසා මේ window එක පිහිටන්නේ screen එකේ වම් කෙලවරේ සිට 700px දුරක් දකුණින් සහ screen එකේ උඩ කෙලවරේ සිට 350px දුරක් පහතින් ය.
-700+-350 ලෙස (-) අගයන් භාවිතා කලහොත් පිළිවෙලින් screen එකේ සිට දකුණේ window එකේ දකුණු කෙලවට දුරත් සහ screen එකේ පහළ කෙලවරේ සිට window එකේ පහළ කෙලවරට දුරත් ලෙස සැලකේ.
Created at : 2024-02-01
Tkinter - Window resizing
import tkinter as tk

root = tk.Tk()
root.title('hello! Python')
root.resizable(False, False)

root.mainloop()
Output :

resizable() method එක භාවිතා කරලා අපිට window එකේ ප්රමාණය වෙනස් කල හැකිද නොහැකිද යන්න සඳහන් කරන්න පුලුවන්. මෙතන තියන parameter 2න් පලවෙනියට තියන parameter එකෙන් කියවෙන්නේ තිරස්ව වෙනස් කළ හැකිද නොහැකිද බව සහ දෙවෙනි එකෙන් කියවෙන්නෙ සිරස්ව වෙනස් කළහැකිද නොහැකිද යන බවයි. කලින් උදාහරණෙදි resizable(False, False) මගින් කියවෙන්නෙ තිරස්ව සහ සිරස්ව window එක වෙනස් කළ නොහැකී කියන එක. වෙනස් කළ හැකි විදියට නිර්මාණය කරනවානම් අදාල parameters 2ට True ලබාදෙන්න ඕන.
එහෙම නැතිනම් False වෙනුවට 0 ත් True වෙනුවට 1 ත් භාවිතා කරන්න පුලුවන්.
Created at : 2024-02-01
Tkinter - Window icon
import tkinter as tk

root = tk.Tk()
root.title('hello! Python')
root.geometry('400x250+700+350')
root.resizable(0,0)
root.iconbitmap('tkinter-icon.ico')

root.mainloop()
Output :
iconbitmap() method එක භාවිතා කරලා අපිට window එකේ පවතින icon එක වෙනස් කරන්න පුලුවන්. අපි ලබාදෙන්න ඕන .ico කියන වර්ගයේ file එකක් (icon).